
Step by Step Guide: HALLOWEEN SPECIAL

Goodevening Guys,
If you are off out for Halloween this weekend and are struggling with doing your own own make-up, then this guide is for you. You can adapt it to how you want but these are some basic steps on putting on your scary face.
First off. Prep your skin. Excuse the poor focus of the photograph at the top of the page. I used Dermalogica Ultracalming Cleanser to cleanse my face, followed by Kiko Resurfacing Cream to help minimise the appearance of pores. Not forgetting my favourite eye cream by Dermalogica. Use whatever you usually would do to cleanse your skin before applying your day to day make-up.

I know what you are thinking. I am scary enough without make-up. EEP!


Second stage. EYEBROWS. I like to do the eye area first before applying a base. I always have done, I just find it works easier for me, however if this seems a little backwards to you then by all means have a read through the steps and start at whatever stage you feel comfortable.
I applied my eyebrows with an Illamasqua Eyebrow Cake in Vehement. This is much darker shade than what I would normally use, but this is Halloween after all.


The next step is starting the eye area. I did not apply primer as I knew I would be taking this off but if you have a big night planned and will be out till dawn then definitely prep the eyelid with an eye primer. This will prevent any creasing. Take a dark eyeshadow, I used a matte black one by Rimmel. Take a blending brush, something like the M.A.C 217 brush and blend the powder out all over the lid and take it underneath the waterline too.


Once the base colour for the eye area has been applied you want to define this area even more. I layered a combination of a black face paint and a gel eye liner by Maybelline. I wanted a winged eye shape to really draw attention to my eyes. This is really easy to do, I used a cotton bud to build up the layers and wing the shape out, but if you find it easier to use a brush then do so.
At this stage you can really see the shape of the eyes coming together.


Time to start adding some colour. I had a tub of red glitter in my kit, I think I bought it from a make-up store in Covent Garden in London, but you can use any glitter you have in your make-up bag. Barry M and M.A.C do a great selection of glitters and pigments. I applied this again with a cotton bud to the inner corner of my eye and created a v shape by lining each corner of the top and bottom water line. I then used the Nars Velvet lip pencil underneath my eye because I liked the glossy texture. Line your waterline with a white eye liner pencil, this opens your eyes up and brings out the white of your eye.


Here I wanted to start mapping out the areas where I wanted shadow and depth. I used a grey face paint across the centre of the face. Most local supermarkets will be selling Halloween make-up this time of year for not a lot of money. I took this all the way up to underneath the eye area.


Nearly at the final stage guys, but first we need to finish off the base. Use a white face paint, or like I did a white foundation. I find Illamasqua Rich Liquid Foundation to be the best for coverage. Apply this all over the face, obviously not going over the eye area or where you have just applied a map for your contouring. Apply with a foundation brush and blend with your fingers. For tricky areas like under the brow and the nose use your little finger or a cotton bud to cover the skin.
Remember the dark eyeshadow you used to create the eye base? Take the same colour and the same blending brush and suck in your cheeks. By doing this you will see where your cheek bones lie. Now we want to enhance these cheek bones. Take the blending brush and follow the line of your cheek bone and buff and blend the powder creating this contoured shape. Really go for it and make it super dramatic for a wicked Halloween finish.

Last but not least. The lips. Take the darkest lipstick you have in your make-up bag. I used a mixture of Tom Ford Black Orchid and Nars Congo Red. I then added a lipgloss by Lipstick Queen to create a different shiny texture.
You can leave it at this or you can play around with your liptick and gloss, or go all out and buy fake blood, to make the chin area appear bruised.
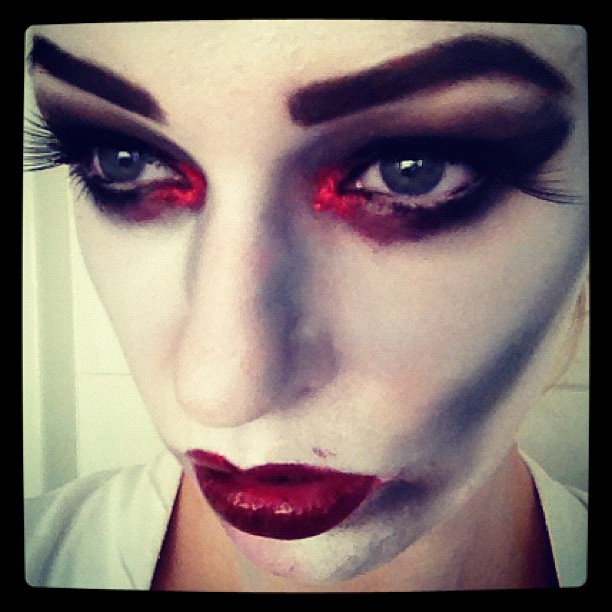

That is it. That is all you need to do to give yourself a scary Halloween make-over! I hope you all enjoy this post. If any of you give this a go please get in touch via the comment box below I would love to see your recreations. Have a fabulous weekend guys!!
See you soon,
